Install Vnecoms Magento 2 Extensions Using Composer
This topic explains how to install extensions you purchase from the Vnecoms website using the Composer - a dependency manager for PHP, Composer declare the libraries your project depends on and it will manage (install/update) them for you so it is very useful if you have so many libraries or modules. You can use the same procedure to install any extension.
To install an extension, you must:
- Get an access key.
- Load composer packages.
- Verify that the extension installed properly.
- Enable and configure the extension.
1. GET AN ACCESS KEY
Firstly, you will need an access key to access to VNECOMS's composer. Login to your customer email account at vnecoms.com. In My Account page, click to Access Key in left navigation bar. You can also just click to this link https://www.vnecoms.com/access-keys/.
Click to Create a new Access Key to start adding new access key.
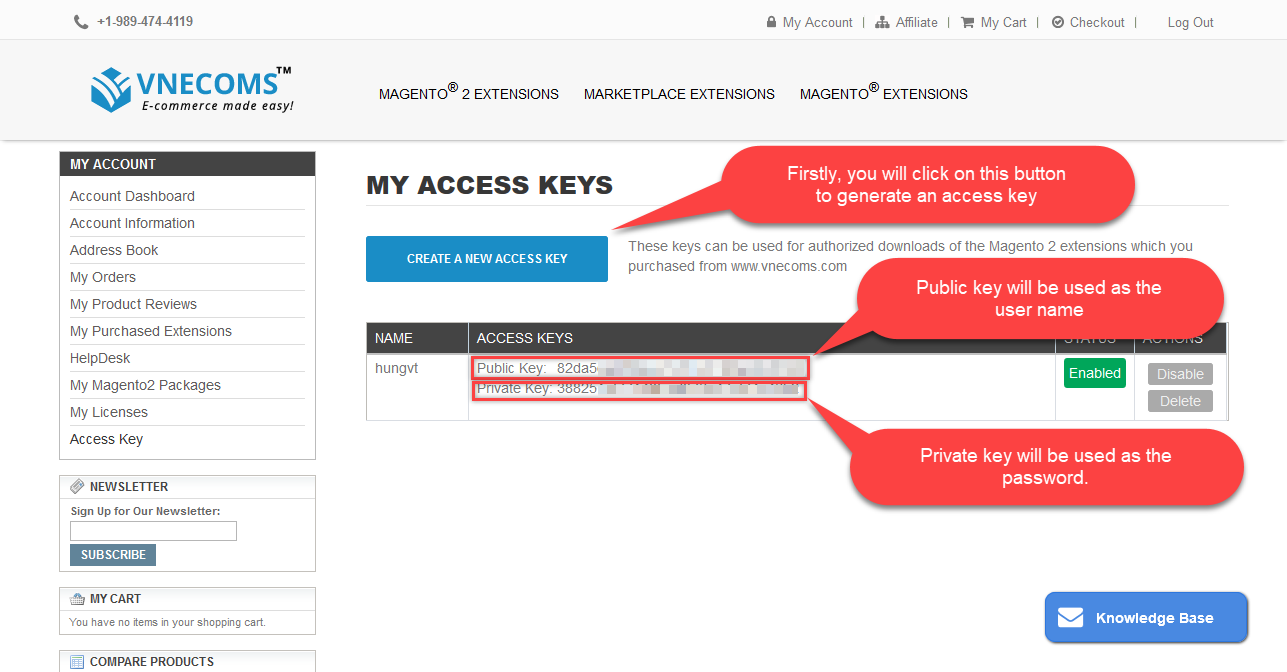
After you get the access key, visit to vnecoms repo page: https://repo.vnecoms.com You will be asked for login. Use your access key which you have just created to login with user name is the public key and password is private key
2. LOAD COMPOSER PACKAGE
After logging in the Vnecoms repository page, you will be able to see the composer command to install your purchased extension along with extension's composer name and version.
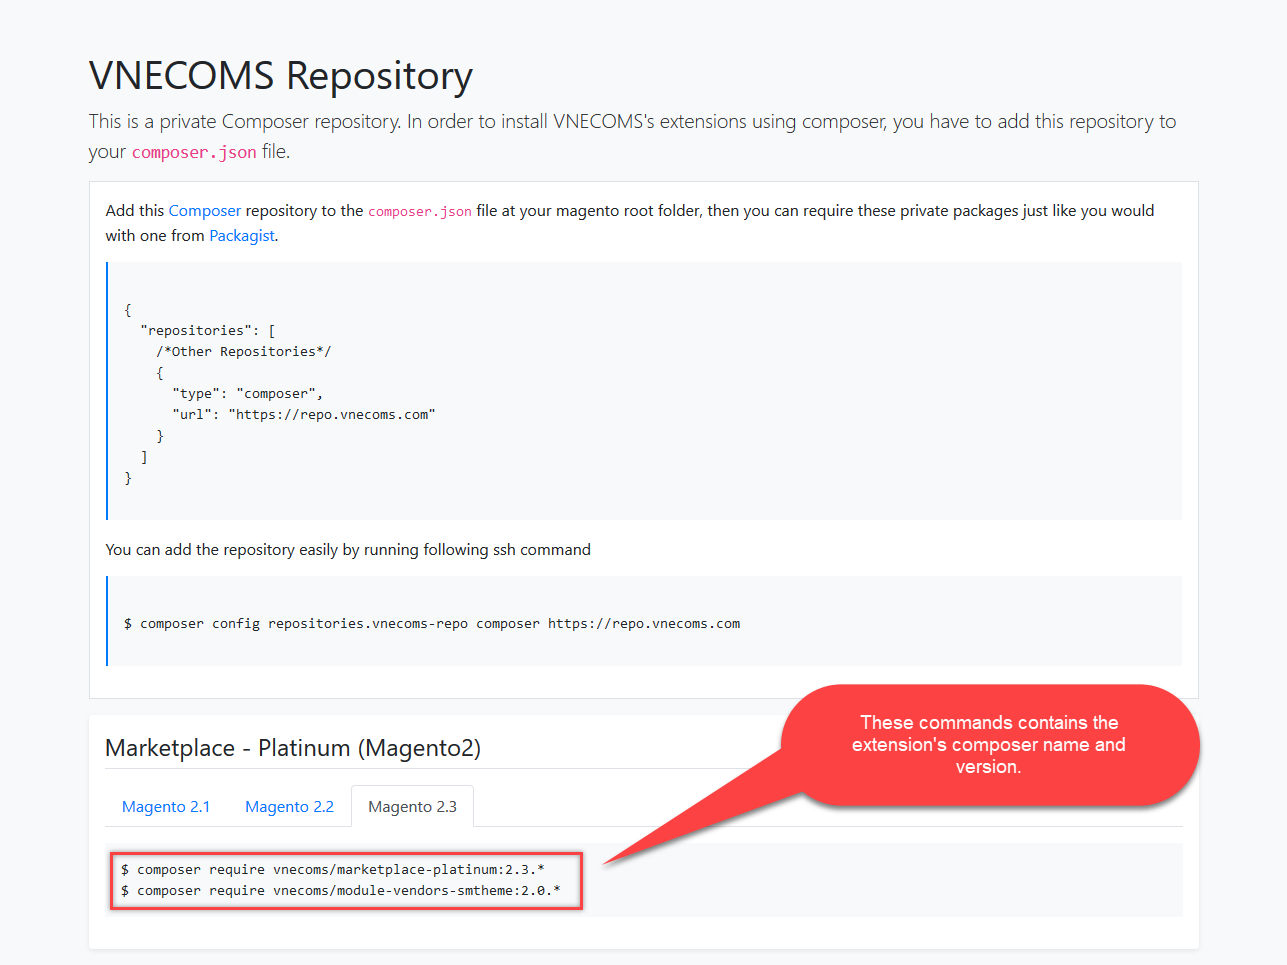
2.1 Update composer.json file
Add this Composer repository to the composer.json file at your magento root folder, then you can require these private packages just like you would with one from Packagist.
{
  "repositories": [
    {
      "type": "composer",
      "url": "https://repo.vnecoms.com"
    }
  ]
}
You can add the repository easily by running following ssh command. We high recommended you use this approach to avoid errors in composer.json
$ composer config repositories.vnecoms-repo composer https://repo.vnecoms.com2.2 Update a auth.json file
While install if you have require magento credentials, you can add magento authentication key easily by running command. That will store it in the current directory's auth.json
$ composer config http-basic.repo.magento.com username passwordOr define global
$ composer config --global http-basic.repo.magento.com username passwordusername password can get in here after login
You can do same for vnecoms repo
$ composer config http-basic.repo.vnecoms.com username passwordusername password can get in access key after login vnecoms customer dashboard
2.3 Load a composer package
In order to load a composer package, find the extension which you want to load from VNECOMS's repository page. Copy the installation code corresponding with your magento version, access to your server using ssh client (e.g. putty) run the copied command from magento root directly.
The command will be like this
$ composer require <component-name>:<version>
For example,
$ composer require vnecoms/module-core:2.0.0
Make sure choose correct vnecoms module version corresponding your magento version
If your magento is CE (Community Edition) SHOULD NOT require package with suffix name "ee". Packages with name ee only install for Enterprise version only
Package vnecoms/module-vendors-smtheme is optional. Only install if your default theme is Sm Theme. If you not install this theme you don't need to require package
You will be asked for login to https://repo.vnecoms.com/ just enter the access key info which you created in section 1.
Wait for Composer to finish updating your project dependencies and make sure there aren’t any errors:
3. VERIFY THE EXTENSION
To verify that the extension installed properly, run the following command:
$ bin/magento module:statusBy default, the extension is probably disabled:
List of disabled modules:
Vnecoms_Core
The extension name is in the format <VendorName>_<ComponentName>;
4. ENABLE EXTENSION
Some extensions won’t work properly unless you clear Magento-generated static view files first. Use the --clear-static-content option to clear static view files when you’re enabling an extension.
-
Enable the extension and clear static view files:
$ bin/magento module:enable Vnecoms_Core --clear-static-contentYou should see the following output:
The following modules have been enabled: - Vnecoms_Core To make sure that the enabled modules are properly registered, run 'setup:upgrade'. Cache cleared successfully. Generated classes cleared successfully. Please run the 'setup:di:compile' command to generate classes. Generated static view files cleared successfully. -
Register the extension:
$ bin/magento setup:upgrade -
Recompile your Magento project:
In Production mode, you may receive a message to 'Please rerun Magento compile command'. Enter the command below. Magento does not prompt you to run the compile command in Developer mode. $ bin/magento setup:di:compile -
Verify that the extension is enabled:
$ bin/magento module:statusYou should see output verifying that the extension is no longer disabled:
List of enabled modules: Vnecoms_Core List of disabled modules: None -
Clean the cache:
$ bin/magento cache:clean -
Configure the extension in Admin as needed.
If you encounter errors when loading the storefront in a browser, use the following command to clear the cache:
bin/magento cache:flush
5. UPDATE EXTENSION INSTALLED BY COMPOSER
-
Change to developer mode (if you are already in production mode)
php bin/magento deploy:mode:set developer -
Check module outdated
composer outdated <package-name>Example: composer outdated vnecoms/marketplace-standard
-
Require to higher verion
ORcomposer require --no-update <package-name>:<new-higer-version>
ORcomposer update vnecoms/*composer require --no-update <package-name> 2.x.xExample: composer require --no-update vnecoms/marketplace-standard:2.3.1
Example: composer require --no-update vnecoms/marketplace-standard ^2.x.x
command use caret range updates (^) only the last two version numbers: e.g. ^2.x.x ( only x.x will be updated). -
Run setup upgrade
php bin/magento setup:upgrade -
Re-enable back to production mode (if you switch production to developer mode before)
php bin/magento deploy:mode:set production -
Re-compile if you are in production mode (Ignore this step if you are in developer mode)
php bin/magento setup:di:compilephp bin/magento setup:static-content:deploy <locale_used> -
Clear caches
php bin/magento cache:flush
6. REMOVE EXTENSION INSTALLED BY COMPOSER
-
Disable module first
php bin/magento module:disable <VendorName>_<ComponentName> -
Run setup upgrade
php bin/magento setup:upgrade -
Remove module
composer remove <package-name>--no-updateExample: composer remove vnecoms/marketplace-standard --no-update
-
Clear caches
php bin/magento cache:flush